


There is no way around it, tsoureki truly is a labour of love. It takes a few hours to make, but if you’re up for a challenge and have some time, then there’s nothing quite like homemade tsoureki right out of the oven. The fragrant scent, texture, and that first warm bite are so worth it!
This traditional Greek Easter bread is flavoured with aromatic spices like mahlepi, mastiha, and orange zest, which gives tsoureki an irresistibly unique flavour. Tsoureki is beautifully braided before being baked in the oven. It’s a soft and fluffy sweet bread that is infused with a sweet, aromatic flavour.
This sweet bread is traditionally enjoyed on Easter Sunday, as the braids symbolize the Holy Trinity, but tsoureki can be enjoyed year-round. Its stringy texture is so delicious and will make your home smell amazing!
If you’re planning your Greek Easter gathering, then you may also be interested in making buttery koulourakia cookies or learning how to dye Greek Easter eggs.

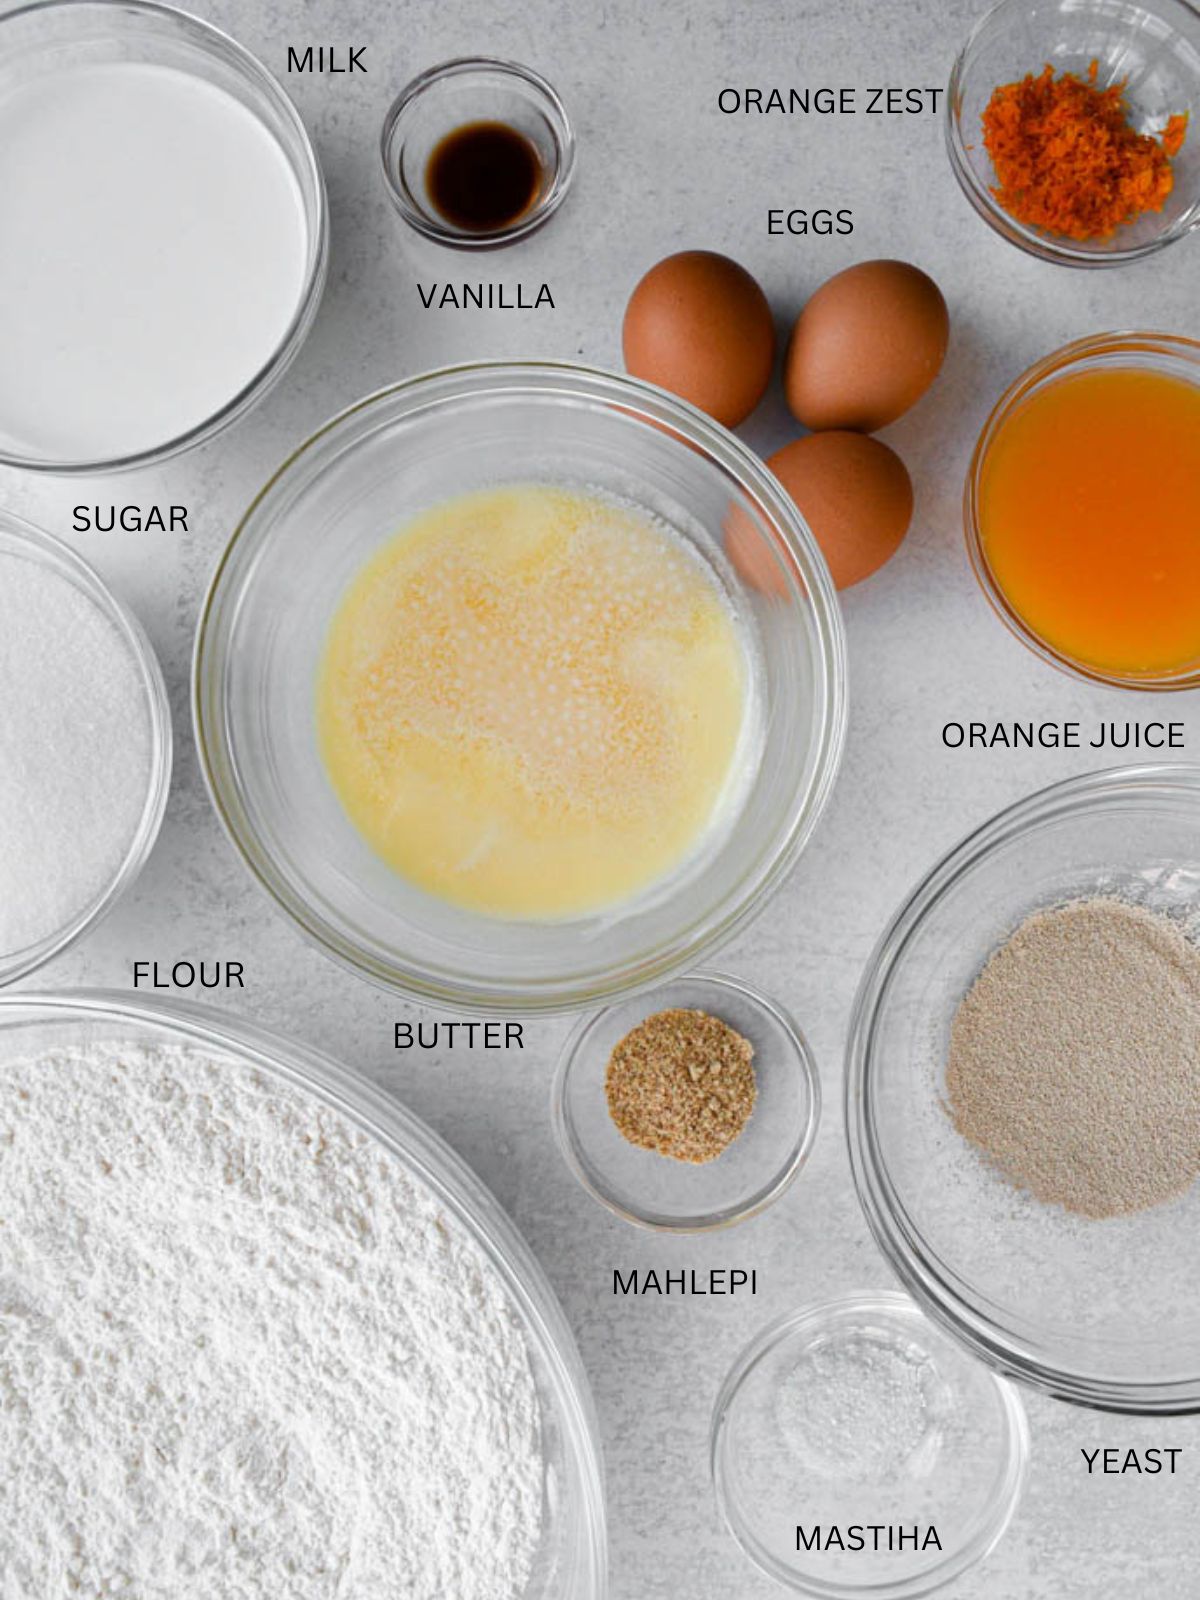
INGREDIENT NOTES
Instant yeast: Fleischmann’s quick-rise instant yeast works great for this recipe, but you can use any brand of quick-rise instant yeast. I like using instant yeast because it reduces the rising time.
Eggs: You’ll need three eggs for the tsoureki dough and one egg for the egg wash. The eggs should be at room temperature so that the dough doesn’t get too cold and the ingredients can incorporate well together without curdling the batter.
Milk: The higher fat in homogenized milk (whole milk) adds colour, flavour and richness to the tsourekia.
Mahlepi (mahlab or mahleb): You should be able to find mahlepi at your local Greek or Mediterranean specialty store or online. Mahlepi is made from seeds of a species of cherry, so it has a slightly fruity taste. It does have a bitter aftertaste, but you can’t taste the bitterness in the tsoureki once it’s baked. On that note, it’s best not to overdo it on the amount of mahlepi, or the tsourekia may turn out bitter.
Freshly ground mastiha (mastic): You should be able to find mastiha at your local Greek or Mediterranean specialty store or online. Mastic is originally from the Greek island of Chios and has a mild, sweet and beautiful light aroma.
Mastiha is a resin and needs to be ground into a powder before using it in baking. You can either use a mortar and pestle or wrap the mastiha in plastic wrap and press down on it with a meat pounder or rolling pin. The mastiha should be a fine powder when added to the tsoureki dough.
Flour: All-purpose flour works best for this recipe because the gluten helps create the stringy texture. Tsoureki has a bread-like texture, so it’s not meant to be cakey. Cake and pastry flour will be too light for tsoureki since cake flour has less protein and gluten. Cake flour has about 7-9% gluten compared to all-purpose flour, which has about 12% gluten.
RECIPE TIPS
- I’d recommend using light-coloured baking sheets so that the tsourekia don’t burn on the bottom. I recommend baking the tsourekia on the second rack from the bottom.
- It’s also essential to allow the dough to rise properly. If the quick yeast doesn’t bubble, then it’s gone bad. In that case, starting fresh with new instant yeast is best, or your tsoureki won’t rise properly. Also, when adding milk to the yeast, it should be slightly warm but not too hot, or it could kill the yeast.
- You can make the tsoureki in different sizes. For fluffier tsoureki, you can use larger dough ball amounts and then don’t roll the dough as thin for the braids.
- If you use more mastiha and mahlepi than the recipe calls, the tsoureki may taste slightly more bitter.
- The dough should be soft and slightly sticky, but you should be able to handle it without the dough sticking to your hands. It can also be helpful to butter your hands before braiding the tsourekia.
HOW TO MAKE TSOUREKI: STEP BY STEP
STEP 1: Prepare the yeast mixture. Add two tablespoons of instant yeast, 1/2 teaspoon of sugar, and 1/4 cup of warm milk in a medium-sized bowl. Stir together, then cover the bowl with saran wrap and loosely with a dry kitchen towel. Place the bowl in a dry, warm place like your pantry. Allow the yeast to rise for 15 minutes. If the yeast doesn’t bubble at this stage, then the yeast may be expired. If this is the case, starting over with a fresh packet of instant dry yeast is best.
STEP 2: Beat the eggs, sugar and butter. While the yeast is rising, whisk together the three eggs, vanilla extract, and slowly add in the sugar. Whisk together on medium-low speed (#2 on a KitchenAid mixer) for 15 minutes. Then slowly add 1/2 cup melted butter. Whisk together the eggs, sugar, and butter. The remaining 1/4 cup of the melted butter will be added to the mixture at the end.
STEP 3: Prepare the dry ingredients. Combine the flour, orange zest, ground mastiha and mahlepi, and a pinch of salt in a large bowl and whisk together.
STEP 4: Add the yeast and milk to the egg mixture. Increase the mixer’s speed to medium speed. Add the risen yeast mixture until it’s incorporated, then mix in the lukewarm milk. Go slowly when adding the liquids to prevent the batter from curdling. Allow the milk to be absorbed before adding more.
If the batter curdles at any point, you can add a couple of tablespoons of the flour mixture and then continue adding the remaining liquids. Mix for a couple of minutes, then turn off the mixer and change the whisk attachment to the dough hook attachment.
STEP 5: Add the dry ingredients and first rise. Turn on the mixer, and add in the flour mixture to the wet ingredients until absorbed. Then add 1/4 cup of the melted butter. Mix until incorporated and a soft dough forms. The dough should be soft and slightly sticky. Use your hands to press the dough a little bit in the mixing bowl.
Transfer the dough to a large, greased bowl (use some melted butter). The bowl should be big enough so that there’s enough space for the dough to expand as it rises. Work the dough a bit with your hands, and then cover the bowl loosely with plastic wrap and a light, clean towel. Place the bowl in a warm, dry place (like your pantry) and allow the dough to rise for 45-60 minutes or until the dough has doubled in size.
STEP 6: Braid the tsoureki. Gently press down on the dough and transfer it to a clean and lightly floured surface. Roll the dough into a log shape and then cut it into six pieces. The dough balls should be similar in size. From there, cut each dough ball in half. So you’ll end up with 12 small dough balls.
Each tsoureki will need 3 small dough balls for the braid. The pieces should be equal or similar in size. Roll out each dough ball into a long rope shape. They should be even in thickness and length. Braid the tsourekia. Line a baking sheet with parchment paper, and place the tsoureki on top. You will need to use multiple baking sheets since the tsoureki dough will rise more on the second rise and when baking in the oven. This recipe will give you four medium-sized tsourekia.
STEP 7: Second rise. Cover the braided tsourekia loosely with saran wrap and a dry, light, clean kitchen towel. You don’t want the towels to be too heavy otherwise, it may impact how much the tsoureki rises. Place the tsoureki in a warm, dry place to rise for two hours.
STEP 8: Brush with egg wash and bake the tsoureki. Once the tsourekia have risen for a couple of hours, it’s time to bake them! In a small bowl, whisk one egg with a bit of milk. Brush the tops of the tsourekia with egg wash to get a beautiful golden colour once baked. The tsoureki will rise more in the oven, so it’s a good idea to leave about 6 inches between the tsourekia. Bake the tsoureki in the oven at 350°F on bake for 25-30 minutes or until golden brown.
When ready, remove the tsourekia from the oven. Allow them to cool on the baking sheet for a few minutes, then transfer them to a cooling rack. Congrats, you did it!!
STORING AND SERVING
The nice thing is that this traditional Greek Easter bread will last at room temperature for 5-6 days. I would recommend allowing it to cool completely and then wrapping each individual tsourekia with saran wrap. This will prevent the tsoureki from drying out too quickly.
Tsoureki bread does freeze really well too! If you’re planning to freeze the tsoureki, allow the tsoureki to cool completely and then wrap it tightly with plastic wrap. Place the wrapped tsoureki in a freezer bag so that none is exposed. When defrosting, it’s important to remove the tsoureki from the bag and the plastic wrap. Because if the tsoureki dethaws in the bag, then it’s more likely to mold more quickly.
It’s also delicious to slice and toast tsoureki pieces and top with your favourite jam. You could also make French toast out of the tsoureki pieces or microwave leftover tsoureki for a few seconds for that right-out-of-the-oven freshness! Or heat it up in the microwave for 30 seconds or so!
- Koulourakia (Greek Easter Butter Cookies)
- How To Dye Red Greek Easter Eggs
- Greek Apricot Tart Recipe (Pasta Flora)

Sweet Tsoureki Recipe (Traditional Greek Easter Bread)
Ingredients
Yeast mixture
- 2 tablespoons quick rise instant yeast
- 1/2 teaspoon sugar
- 1/4 cup homogenized milk lukewarm – added to the yeast
Tsoureki dough
- 3 eggs room temperature
- 1/2 teaspoon pure vanilla extract
- 1 ⅓ cups white granulated sugar
- 1/2 cup unsalted butter melted but not hot
- 5 cups all-purpose flour
- zest of two oranges
- 1/4 teaspoon mastiha powder ground
- 1 ½ teaspoons mahlepi powder ground
- pinch of salt about 1/8 teaspoon
- 1 cup homogenized milk lukewarm
- 1/4 cup unsalted butter melted but not hot
Egg wash
- 1 egg to brush on top of the tsoureki before it goes in the oven
- 1 tablespoon milk
Instructions
- Prepare the yeast mixture. In a medium-sized bowl, combine instant yeast, sugar, and warm milk. Stir together, then cover with plastic wrap and a clean kitchen towel. Place the mixture in a warm, dry spot for 15 minutes. If the yeast doesn't bubble, it's likely expired. If that's the case you'll need to repeat the above steps with new yeast.2 tablespoons quick rise instant yeast, 1/2 teaspoon sugar, 1/4 cup homogenized milk
- Beat the eggs, sugar, and butter. In the bowl of an electric mixer, whisk eggs, vanilla extract, and sugar on medium speed for 15 minutes. Then turn off the mixer and add ½ cup melted butter. Mix together. The remaining ¼ cup of the melted butter will be added to the tsoureki mixture at the end of this recipe.3 eggs, 1/2 teaspoon pure vanilla extract, 1 ⅓ cups white granulated sugar, 1/2 cup unsalted butter
- Prepare the dry ingredients. In a large bowl, combine the flour, orange zest, ground mastiha, mahlepi, and a pinch of salt, and whisk together. Set aside.5 cups all-purpose flour, 1/4 teaspoon mastiha powder, 1 ½ teaspoons mahlepi powder, zest of two oranges, pinch of salt
- Add the yeast and milk to the egg mixture. On medium speed, add in the yeast mixture until it's incorporated and then slowly pour in the lukewarm milk to prevent curdling. If the batter curdles, add a couple of tablespoons of flour and continue mixing. Mix for a couple of minutes, then turn off the mixer and switch from the whisk attachment to the dough hook.1 cup homogenized milk
- Add the dry ingredients and first rise. Turn on the mixer and gradually add the flour mixture, followed by ¼ cup melted butter. Mix until a soft, slightly sticky dough forms. Press the dough gently in the bowl with your hands. Transfer the dough to a greased, large bowl (use a little bit of melted butter), ensuring enough space for the dough to rise. Cover with plastic wrap and a clean kitchen towel, then place in a warm, dry spot to rise for 45-60 minutes, or until doubled in size.1/4 cup unsalted butter
- Braid the tsoureki. Gently press down the dough and transfer it to a clean and lightly floured surface. Roll the dough into a log, then cut it into six even pieces. Divide each piece in half to make 12 small dough balls. For each tsoureki, use 3 dough balls, rolling each into an even-length rope. They should be even in thickness and length. Braid the dough and place the tsourekia on a greased, light coloured non-stick baking sheet or parchment paper. This recipe makes four tsourekia.
- Second rise. Loosely cover the braided tsourekia with plastic wrap and a light, clean kitchen towel. Avoid using heavy towels, as they may affect the dough's rise. Place the tsourekia in a warm, dry spot to rise for two hours.
- Brush with egg wash and bake the tsoureki. Once the tsourekia have risen, it's time to bake them! In a small bowl, whisk one egg with a bit of milk. Brush the tsoureki with the egg wash for a golden finish. Bake at 350°F for about 25 minutes, or until golden brown. Leave about 6 inches between the tsourekia, as they will rise more in the oven. Once the tsourekia are ready, remove them from the oven. Allow them to cool on the baking sheet for a few minutes, and then transfer to a cooling rack.1 egg , 1 tablespoon milk
Notes
-
- I’d recommend using a light-coloured baking sheet so that the tsoureki bakes evenly, and I like to bake the tsoureki on the second rack from the bottom
- It’s also essential to allow the dough to rise properly. If the quick yeast doesn’t bubble, then it’s gone bad. In this case, it’s best to start fresh with fresh new instant yeast. Otherwise, your tsoureki may not rise properly. Also, when adding milk to the yeast, it should be slightly warm but not too hot, or it could kill the yeast.
- You can make tsoureki in different sizes. For fluffier tsoureki, you can use larger dough ball amounts and then not roll the dough as thin for the braids.
- The dough will be soft and slightly sticky, but you should be able to handle it without it sticking to your hands. Buttering your hands or the surface before braiding the tsourekia can also be helpful.
- The tsoureki will rise more in the oven, so it’s good to leave enough space in between the tsoureki. I recommend only putting two tsourekia on one baking sheet (if there’s enough space between them) since they will rise and puff up as they bake.
Nutrition
Date Published: April 27, 2023


Looking forward to trying your recipe! Two questions: 1.comparing your yeast recipe to that on the package, it seems like 2 TB is a lot compared to the sugar and milk ratio. The packet says 2 tsp. to your amount of sugar and milk. Is 2TB of yeast correct? 2. After the flour is added, should you continue until the dough comes away from the bowl and transfers onto the hook or will the dough just stay in the entire bowl? Thanks!!
Hi Martha, thank you so much for reaching out and I’m sorry to get back to you so late. I believe I used 2 tablespoons, but truthfully I haven’t made it since last Easter so I will likely have to test this one again just to be sure. You’ll want to mix until all the flour is incorporated, but the dough will expand as it rests so it’s best to transfer to a bigger/wider bowl so that the dough has enough room to rise. I wish you all the best and would love to hear your feedback if you do decide to try it.
– Ria